Find more Photoshop & PageMaker Notes & Tutorial

Tuesday 31 May 2011

Changing the Stacking Order of Objects in PageMaker


Changing the Stacking Order of Objects:

Whenever you draw an object that overlaps another object, the last one drawn is placed on top. This stacking effect can cause some objects to seemingly disappear. To stacking order of the object can be changed. To do this, select it and choose one of the Bring or Send options on the Element > Arrange Menu.


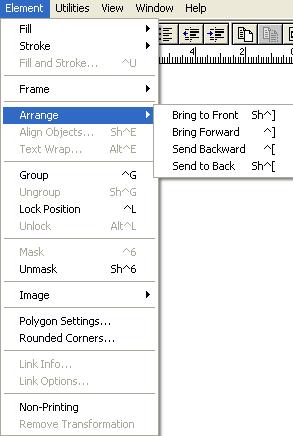
Bring to Front places the object on the top of the stack, while Send to Back places it on the bottom. To move an object one layer at a time, use the Bring Forward or Send Backward commands. Each of these has keyboard shortcuts:


No comments:

Post a Comment

Labels

Add and Subtract blending modes (1) Adobe Bridge (1) Applying transformations (1) Artistic (1) blending effects (1) Blur (1) Brush Stroke (1) change the color of frozen areas (1) Choosing preset page views (1) Creating New Images (1) Creating temporary masks in Quick Mask mode (1) delete (1) delete a wire frame (1) Digimarkmarc filters (1) distort (2) Duplicating layers (1) Editing Menus (1) Filters - Choosing effect (1) Filters - Defining undistorted areas (1) flip or rotate (1) Freezing and thawing areas (1) Guidelines for using the History Palette (1) Improving performance (1) Loading a selection into an image (1) Loading images and textures (1) Making Color adjustment (1) Making Sticky Note (1) manipulate the object in three dimension (1) masks (1) Noise (3) or apply perspective (1) or hide a color sample (1) Pagemaker Tutorial - Basic (1) Pixelate (1) reconstruct areas to match distortions (1) Reconstructing distortions (1) Render (1) Replace Color Command (1) rotate (2) Save Changes in the Current File (1) Saving a mask selection (1) Saving Image Files (1) scale (1) Seeing the color values of pixels (1) Sharpen (1) show or hide frozen areas (1) Sketch (1) Stylize (1) Texture (1) the eyedropper or color sampler tool (1) Tips for creating special effects (1) To apply multiple types of transformations (1) To change the Quick Mask options (1) To load a saved selection using shortcuts (1) To repeat a transformation (1) To use the eyedropper tool and Color palette (1) Transforming and manipulating objects (1) use the Info palette (1) Using History Palette (1) Using texture and glass surface controls (1) using the Apply Image command (1) Using the Calculations command (1) Using the Liquify command (1) Using the Liquify dialog box (1) Viewing Pages (1) Working with Palettes (1)