Find more Photoshop & PageMaker Notes & Tutorial

Tuesday, 31 May 2011

Working with Brushes in Photoshop


Working with Brushes:

Working with brushes is an important part of using the painting and editing tools. The brush you select determines many characteristics of the resulting stroke. Photoshop and ImageReady provide a variety of present brushes to fill a wide range of uses. In Photoshop, you can also create custom brushes using the Brushes palette.

Brushes Palette:
Click on Window menu > Brushes, or click the palette button on the right side of the options bar if you have a painting tool, erasing tool, toning tool, or focus tool selected.


Selecting Preset Brushes:
The Brush pop-up palette in the options bar for the painting and editing tools lets you view, select, and load preset brushes. In Photoshop, you can also use the Brushes palette to view, select and load preset brushes.

Following steps will help you to select the preset brush:
1.Click a brush in the Brush pop-up palette or Brushes palette.
2. Specify a diameter for the brush by dragging the slider or entering a value. If the brush has a dual tip, both the primary and dual brush tips are scaled.
3. Click Use Sample Size to use the original diameter of the brush tip. This option is available only if the brush tip shape is based on a sample.

To change view of preset brushes:
Choose a display option from the Brush pop-up palette menu or Brushes palette menu:


1.Text Only to view the brushes as a list.
2. Small or Large Thumbnail to view the brushes as thumbnails.
3. Small or Large List to view the brushes as a list with thumbnails.
4. Stroke Thumbnail to view a sample brush stroke with each brush thumbnail.

Changing the Stacking Order of Objects in PageMaker


Changing the Stacking Order of Objects:

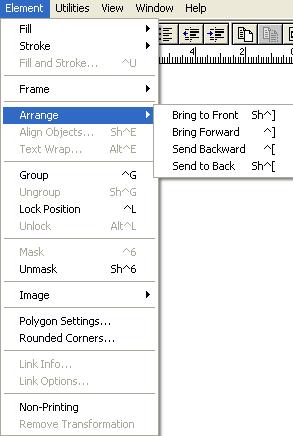
Whenever you draw an object that overlaps another object, the last one drawn is placed on top. This stacking effect can cause some objects to seemingly disappear. To stacking order of the object can be changed. To do this, select it and choose one of the Bring or Send options on the Element > Arrange Menu.


Bring to Front places the object on the top of the stack, while Send to Back places it on the bottom. To move an object one layer at a time, use the Bring Forward or Send Backward commands. Each of these has keyboard shortcuts:


Using Character Map Accessory in PageMaker


Using Character Map Accessory:

Windows comes with an accessory called Character Map that lets you insert special characters. Most of these characters will be from symbol fonts, such as Singwinds, Symbol and Zapf Dingbats. Under Windows, click the Start button > Programme > Accessories > System Tools > Character Map. From the Font list, select the desired font. Click the symbol you want. Choose the Select button, and then click the Copy command to place the character on the Clipboard. Close or minimize Character Map and return to PageMaker. Paste the symbol in the desired location.


Monday, 30 May 2011

Water Text Effect – Photoshop


Water Effect 

Following are the few steps to add water in your text:

1.  
You’ll need to make a new document in Photoshop and choose the size you need. In this tutorial I have created a document with wide 1000 pixels and high 1000 pixels and resolution 300 DPI. Click OK when you're done to exit out of the dialog box. The new document will appear on your screen:


2.
Next you have to select a background. Here, I have used black as the background for my text effect, because my text effect will be more visible in black background. To do that, go up to the Edit menu at the top of the screen and choose Fill. This brings up the Fill dialog box. Choose Black for the Contents option at the top of the dialog box. Also, make sure the Blending Mode is set to Normal and Opacity is set to 100% (these are the default settings so you probably won't need to change them). Click OK when you're done to exit out of the dialog box.


3.
Select the Type Tool from the Tools palette, or press the letter ‘T’ on your keyboard to quickly select it with the shortcut. Once you have the Type Tool selected, the Options Bar at the top of the screen will display options for working with type. Choose the font, font size and text color that you want to use, then click inside the document and add your text. If you want to get a little fancy with your text, you'll find additional options for formatting type, like leading, kerning, tracking, and baseline shift, in Photoshop's Character palette which you can quickly access by clicking on the Character and Paragraph palette toggle icon in the Options Bar.


For this tutorial I have taken a blue color for my text and typed "Water Effect" into my document, since I have taken the photo of water wave for the texture.


Note: All of your text should be on a single type layer.


4.
Open the photo you want to use as the texture in the effect. Here's the image I'll be using:


5.
Switch back over to your original document (the one containing the text). Make sure the type layer is highlighted in blue in the Layers palette, which means it's the layer currently selected. If it's not selected, click on it to select it. Then click on the Layer Mask icon at the bottom of the Layers palette. It won't look like anything has happened in the document, but if you look at the type layer again and you'll see that a white layer mask thumbnail has now appeared:


6.
Now paste your texture photo directly into the layer mask as I have added. Normally, Photoshop doesn't allow us to paste an image into a layer mask, but here's the trick. Hold down your Alt (Win) / Option (Mac) key, then, click on the layer mask thumbnail in the Layers palette:


You'll see your document window fill with solid white. What you're actually seeing is the layer mask itself, which is something we don't normally see when working in Photoshop. With the layer mask now visible inside the document window, copy the texture photo and paste it into the layer mask. To clear the selection outline from around the photo, go up to the Select menu and choose Deselect, or press Ctrl+D (Win) / Command+D (Mac). Since layer masks deal only with black, white and shades of gray, the texture photo will appear black and white inside the layer mask:


7. 
With the photo now pasted into the layer mask, once again hold down Alt (Win) / Option (Mac) and click on the layer mask thumbnail in the layer palette:


Now, you'll see the texture photo appearing inside the text:


Thanks.......

Saturday, 28 May 2011

Moving the Cursor in PageMaker


Moving the Cursor:

To position the I – beam, move it to where you want to begin entering text and click the left mouse button. You will see a blinking vertical bar, called the Insertion points. The location of the insertion point indicates where text will appear when you type. Once you have an insertion point, you can slide the mouse to move the I -beam out of the way.


When you click inside the margin guides, the cursor appears just to the right of the left margin guide, regardless of where you clicked. To move the cursor in existing text, you can use the keyboard. The arrow keys move the cursor (not the I -beam) one character or line at a time.


Sorting Pages in Pagemaker


Sorting Pages:

The Layout > Sort Pages command is a very handy tool that provides you with instant thumbnails of all the pages in your publication. It also accurately depicts double sided documents, and even provides an adequate account of a document.


But the main attraction of the Sort Pages command is that it will quickly move pages, and all elements, to different places in a publication. As with inserting and removing pages, resorting pages changes the flow of a multipage text file.

Sorting pages is a matter of clicking and dragging. You select the page to move by clicking it; for multiple pages, hold down Shift as you click each one. Once selected, drag any of the selected pages to the desired new location. If your publication is double sided, then PageMaker shows you pages in pairs and treats its page spread as a single entity. When you reorder pages, the thumbnails of each page are resorted, and the original page number, with dotted lines around it, is shown next to the new page number.

Wednesday, 25 May 2011

Creating Table In PageMaker


There is no concept of tables native in PageMaker, except for the buggy Adobe Table that is included with PageMaker. You can make tables with the line drawing tools and rule above and below paragraph settings, but you must be patient to do this. You will also need to get familiar with Indents and Tabs (CTRL+I) to make PageMaker native tables. Combined with the line tool and rule above and below paragraphs, you can make some good tables.

Having said all that, about the best practices with PageMaker, there is another way if you are on Windows. You can copy and paste tables you make in Microsoft Word to PageMaker. 

Here is the secret:
1.) Make a table of your choice in Word, Select or Copy the whole table, and nothing but the table.


2.) Switch to your PageMaker document. Choose Paste Special from the Edit menu. Choose Enhanced Metafile.


You should now have a nice table.


It usually works, but some service bureaus and printers have trouble with it. I have never had any problems, but I have pretty good luck in these matters.
But there is another and much easier way of making a table with all its contents, that is just by using Edit > Insert Object command.

Follow these steps:
1.Go to ‘Edit’ Menu option in PageMaker and click ‘Insert object’.


2. This will open the ‘Insert Object’ dialog box.


3. Choose ‘Microsoft Word’ from the Object Type option.


4. This will open Microsoft Word-here you create your table along with its content.

5. Simply select the File > Update command or ‘Ctr + S’ key from Microsoft Word.


6. This will automatically import your Word table to PageMaker document.

Labels

Add and Subtract blending modes (1) Adobe Bridge (1) Applying transformations (1) Artistic (1) Blur (1) Brush Stroke (1) Choosing preset page views (1) Creating New Images (1) Creating temporary masks in Quick Mask mode (1) Digimarkmarc filters (1) Duplicating layers (1) Editing Menus (1) Filters - Choosing effect (1) Filters - Defining undistorted areas (1) Freezing and thawing areas (1) Guidelines for using the History Palette (1) Improving performance (1) Loading a selection into an image (1) Loading images and textures (1) Making Color adjustment (1) Making Sticky Note (1) Noise (3) Pagemaker Tutorial - Basic (1) Pixelate (1) Reconstructing distortions (1) Render (1) Replace Color Command (1) Save Changes in the Current File (1) Saving Image Files (1) Saving a mask selection (1) Seeing the color values of pixels (1) Sharpen (1) Sketch (1) Stylize (1) Texture (1) Tips for creating special effects (1) To apply multiple types of transformations (1) To change the Quick Mask options (1) To load a saved selection using shortcuts (1) To repeat a transformation (1) To use the eyedropper tool and Color palette (1) Transforming and manipulating objects (1) Using History Palette (1) Using texture and glass surface controls (1) Using the Calculations command (1) Using the Liquify command (1) Using the Liquify dialog box (1) Viewing Pages (1) Working with Palettes (1) blending effects (1) change the color of frozen areas (1) delete (1) delete a wire frame (1) distort (2) flip or rotate (1) manipulate the object in three dimension (1) masks (1) or apply perspective (1) or hide a color sample (1) reconstruct areas to match distortions (1) rotate (2) scale (1) show or hide frozen areas (1) the eyedropper or color sampler tool (1) use the Info palette (1) using the Apply Image command (1)