Find more Photoshop & PageMaker Notes & Tutorial

Showing posts with label rotate. Show all posts

Monday, 11 April 2011

Applying Transformations

Applying transformations

The commands under the Transform sub-menu let you apply the following transformations to an item:
    • Scaling enlarges or reduces an item relative to its reference point. You can scale horizontally, vertically, or both horizontally and vertically.
    • Rotating turns an item around a reference point. By default, this point is at the center of the object; however, you can move it to another location.
    • Skewing lets you slant an item vertically and horizontally.
    • Distorting lets you stretch an item in all directions.
    • Applying perspective lets you apply one-point perspective to an item.
In Photoshop, you can perform several commands in succession before applying the cumulative transformation. For example, you can choose Scale, drag a handle to scale, and then choose Distort, drag a handle to distort, and press Enter or Return to apply both transformations. In ImageReady, you can perform multiple types of transformations at the same time using the Transform > Numeric command.
To scale, rotate, skew, distort, or apply perspective:
  1. Select what you want to transform.
  1. Choose Edit > Transform > Scale, Rotate, Skew, Distort, or Perspective.
Note: (Photoshop) If you are transforming a shape or entire path, the Transform menu becomes the Transform Path menu. If you are transforming multiple path segments (but not the entire path), the Transform menu becomes the Transform Points menu.
  1. In the options bar, click a square on the reference point locator.
  1. Do one or more of the following:
    • If you chose Scale, drag a handle on the bounding box. Press Shift as you drag a corner handle to scale proportionately. When positioned over a handle, the pointer becomes a double arrow.
    • If you chose Rotate, move the pointer outside of the bounding border (it becomes a curved, two-sided arrow), and then drag. Press Shift to constrain the rotation to 15° increments.
    • If you chose Skew, drag a side handle to slant the bounding box.
    • If you chose Distort, drag a corner handle to stretch the bounding box.
    • If you chose Perspective, drag a corner handle to apply perspective to the bounding box.
    • For all types of transformations, enter a value in the options bar. For example, to rotate an item, specify degrees in the rotation text box.
  1. If desired, switch to a different type of transformation by selecting a command from the Edit > Transform submenu.
When transforming a bitmap image (versus a shape or path), it becomes slightly less sharp each time you commit a transformation; therefore, performing multiple commands before applying the cumulative transformation is preferable to applying each transformation separately.
  1. When you're satisfied with the results, do one of the following:
    • Press Enter (Windows) or Return (Mac OS); click the Commit button in the options bar; or double-click inside the transformation marquee.
    • To cancel the transformation, press Esc or click the Cancel button in the options bar.
To flip or rotate precisely:
  1. Select what you want to transform.
  1. Choose Edit > Transform and choose one of the following commands from the submenu:
    • Rotate 180° to rotate by a half-turn.
    • Rotate 90° CW to rotate clockwise by a quarter-turn.
    • Rotate 90° CCW to rotate counterclockwise by a quarter-turn.
    • Flip Horizontal to flip horizontally, along the vertical axis.
    • Flip Vertical to flip vertically, along the horizontal axis.
Note: If you are transforming a shape or entire path, the Transform command becomes the Transform Path command. If you are transforming multiple path segments (but not the entire path), the Transform command becomes the Transform Points command.
To repeat a transformation:
Choose Edit > Transform > Again, Edit > Transform Path > Again, or Edit > Transform Points > Again.
To duplicate an item when transforming it:
Hold down Alt (Windows) or Option (Mac OS) when selecting the Transform command.
To apply multiple types of transformations at the same time (ImageReady):
  1. Select what you want to transform.
  1. Choose Edit > Transform > Numeric.
  1. Do one or more of the following, and click OK:
    • Select Position and enter values for the new location in the X (horizontal position) and Y (vertical position) text boxes. Select Relative to specify the new position in relation to the current position.
    • Select Scale. Enter the dimensions in the W and H text boxes, or enter a scaling percentage in the Scale text box. Select Constrain Proportions to maintain the aspect ratio.
    • Select Skew and enter degrees in the H (horizontal skew) and V (vertical skew) text boxes.
    • Select Rotate. Enter degrees of rotation in the Angle text box, or drag the in the circle to the right of the text box.

Wednesday, 16 March 2011

getting started with PageMaker - using the Adobe PageMaker Toolbox

PageMaker Toolbox


The Pointer Tool

The Pointer tool enables you to pick, drag and drop text boxes, images and other objects, which can then be resized, moved or can have their attributes changed.

Text Tool

The Text tool enables you to select and edit text, as well as insert text boxes. Click the text tool and then click on the document and start typing in text.


Rotate Tool

The rotate tool enables you to rotate a text box or image to a desired angle. Select the rotate tool, and click on the object's reference point. Drag the object to the angle you want it to be.


Crop Tool

Enables you to crop imported images down to size. You can only use this PageMaker tool on .tiff images.


Oblique Line Tool

Enables you to draw straight lines at an angle. Click on the oblique line tool, then click on the document. Drag in the desired direction to draw a line.


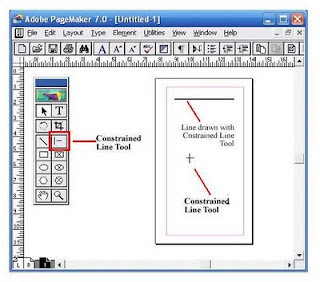
Constrained Line Tool

The constrained line tool enables you to draw horizontal, vertical and 45-degree angle lines. Click on the constrained line tool, then click on the document. Drag in the desired direction to draw a line.


Box Tool

The box tool enables you to create rectangular shapes. Select the box tool and click on the document. Drag to create a rectangular shape.


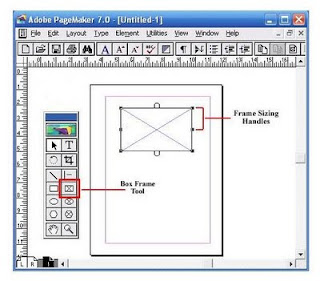
Rectangle Frame Tool

The rectangle frame tool enables you to create a rectangular text box that you can type your text into. Select the rectangle frame tool, then click on the document. Drag to draw a rectangular frame. Select the Text tool from the toolbox and click inside the frame. Type in your text. The text will be confined within the text box.


Circle Tool

The circle tool enables you to create a circular or oval shape. Select the circle tool, click on the document. Drag to draw a circle or ellipse.


Circular Frame Tool

The circular frame tool enables you to create a circular or oval-shaped text box that you can type your text into. Select the circular frame tool, then click on the document. Drag to draw the circular frame. Select the text tool from the toolbox and click inside the frame. Type in your text. The text will be confined within the text box.


Polygon Tool

The polygon tool enables you to create a shape that has more than four sides. Select the circular frame tool, then click on the document. Drag to draw the polygonal shape. To modify the polygonal shape, click on Element and then select Polygon Settings from the drop down menu.


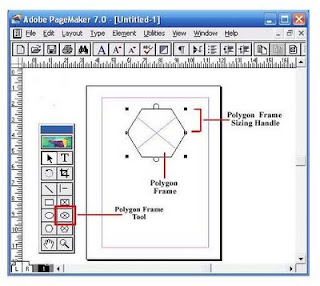
Polygon Frame Tool

The polygon frame tool enables you to create a polygonal text box. Select the polygon frame tool, then click on the document. Drag to draw the polygon frame. Select the text tool from the toolbox and click inside the frame. Type in your text. The text will be confined within the text box.


Hand Tool

The hand tool enables you to reposition a page on your screen for optimal view. It is especially useful when you are working with a large document and need to navigate a large page. Select the hand tool and click on the page. Drag to navigate from one part of the page to another.


Zoom Tool

The zoom tool enables you to magnify or shrink the area of the page on your screen.

Keyboard Shortcuts of using Tools:


Labels

Add and Subtract blending modes (1) Adobe Bridge (1) Applying transformations (1) Artistic (1) Blur (1) Brush Stroke (1) Choosing preset page views (1) Creating New Images (1) Creating temporary masks in Quick Mask mode (1) Digimarkmarc filters (1) Duplicating layers (1) Editing Menus (1) Filters - Choosing effect (1) Filters - Defining undistorted areas (1) Freezing and thawing areas (1) Guidelines for using the History Palette (1) Improving performance (1) Loading a selection into an image (1) Loading images and textures (1) Making Color adjustment (1) Making Sticky Note (1) Noise (3) Pagemaker Tutorial - Basic (1) Pixelate (1) Reconstructing distortions (1) Render (1) Replace Color Command (1) Save Changes in the Current File (1) Saving Image Files (1) Saving a mask selection (1) Seeing the color values of pixels (1) Sharpen (1) Sketch (1) Stylize (1) Texture (1) Tips for creating special effects (1) To apply multiple types of transformations (1) To change the Quick Mask options (1) To load a saved selection using shortcuts (1) To repeat a transformation (1) To use the eyedropper tool and Color palette (1) Transforming and manipulating objects (1) Using History Palette (1) Using texture and glass surface controls (1) Using the Calculations command (1) Using the Liquify command (1) Using the Liquify dialog box (1) Viewing Pages (1) Working with Palettes (1) blending effects (1) change the color of frozen areas (1) delete (1) delete a wire frame (1) distort (2) flip or rotate (1) manipulate the object in three dimension (1) masks (1) or apply perspective (1) or hide a color sample (1) reconstruct areas to match distortions (1) rotate (2) scale (1) show or hide frozen areas (1) the eyedropper or color sampler tool (1) use the Info palette (1) using the Apply Image command (1)