
|
|
Making Sticky Note


Use the images bellow as reference.

 Note: if you prefer to add blur effect to the 'New' you have to do this - go to menu: Filter > Blur > Gaussian Blur and set it to 3,5 pixels.

Try it and enjoy......
Do write comment or mail me if you like the blog or have any suggestion.. Thanks...
Instruction - 1
Create a new document: 300x300 pixels.
Instruction - 2
Create a new layer and call it 'Sticky Note'.
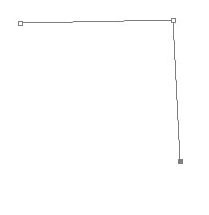
Select the Pen Tool (P) and start defining some control points in order to shape them as a sticky note.
Following are images as an example which you can follow:
Select the Pen Tool (P) and start defining some control points in order to shape them as a sticky note.
Following are images as an example which you can follow:
Instruction - 3
Duplicate the 'Sticky Note' layer, name it 'New' and drag it bellow the 'Sticky Note' layer.
Instruction - 4
Go to blending options of the 'Sticky Note' layer (should be on the very top) and use these values:
; Gradient Overlay
; Gradient Overlay
- Opacity: 100%
- Gradient: from #f4db42 in location 0% to #ffec69 in location 100%;
- Style: Linear (Align with Layer - checked)
- Angle: 72º
- Scale: 100%
Instruction - 5
Go back to your “New” layer. Apply a dark color on it (black is fine) by double-clicking the color thumbnail and picking the color you want.
Instruction - 6
Nudge it to the left and to the bottom by 6 - 8 pixels each.
Instruction - 7
Change the opacity of this layer (New) to approximately 50%.
Instruction - 8
Press Ctrl+T or go to menu Edit > Free Transform to transform this layer.
Instruction - 9
This will show you 8 control points. Hold down Ctrl and click and drag the top-left control point right under the sticky note margin.Use the images bellow as reference.
Instruction - 10
You can choose any background suitable and apply it as a background to the existing image.
Instruction - 11
You can add some handwriting text as added by me to improve the overlook.Try it and enjoy......
Do write comment or mail me if you like the blog or have any suggestion.. Thanks...


No comments:
Post a Comment