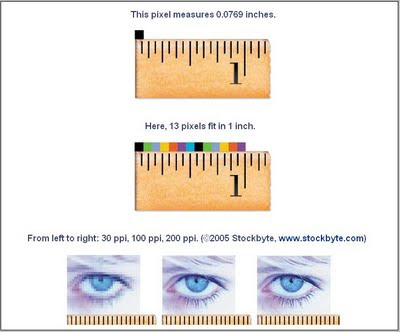
Understanding Pixel Size
Every photograph you ever see in Photoshop is made out of a grid of different-colored squares that are known as pixels. So, imagine that you printed a photograph and then zoomed in on it with a microscope. Once you start to see the individual pixels, you can start to think about how large they are. If you slid a ruler under that microscope, you could measure the size of an individual pixel. Resolution is simply a measurement of how large a pixel is when it's printed. Maybe you end up with pixels that are 0.0769 inches in size. The only problem is that that's not a very friendly number, because most people don't like dealing with decimals. So, instead, why don't we look at more than one pixel and simply measure how many of them fit in 1 inch? In that case we'd end up with 13 pixels per inch, or ppi. The smaller the pixels are, the more of them you can fit into an inch, so higher ppi settings mean smaller pixels. Resolution simply means how large a pixel is when you print it, and it's usually measured in pixels per inch.
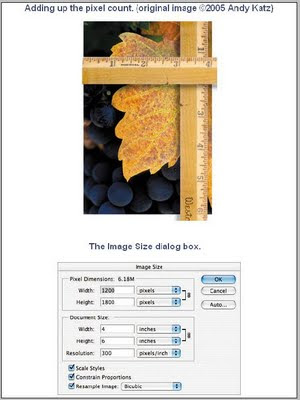
Let's see how that applies to an image. Imagine you have an image that's 4 by 6 inches, and you wanted to fit 300 pixels in each inch. With that information and a little simple math, you can figure out the total number of pixels there would be in the width and height of the image. If you add up how many inches you have and multiply that by 300, then you could say you have 1,200 by 1,800 at 300ppi. With that information, you could also go the other direction and figure out how many inches wide and tall the image is. Just take the width in pixels and divide it by how many pixels you'll be printing in each inch (1,200/300 = 4). So 1,200 by 1,800 at 300ppi is also 4 by 6 inches at 300ppi. Either way, you would be describing the same image. That's exactly what Photoshop does when you choose Image > Image Size. At the top of the dialog box, Photoshop shows you the total number of pixels you have in the width and height of your image. At the bottom, it shows you how large those pixels will be when you go to print your image. That's usually the same number you typed into your scanner when you scanned the image, or, if you created the image from scratch, you provided when Photoshop asked you for the resolution setting. For Photoshop to figure out the width in inches, all it does is take the total width in pixels and divide that by how many pixels you'll be printing in each inch.


No comments:
Post a Comment